Setting the Camera Switch Point and Selecting the Camera
Set the camera switch point as the trigger to switch cameras, and select clips to use.
-
Switch the mode to the multicam mode in advance.
Setting Track to be Controlled with Camera Switch Point
You can set tracks to be controlled with the camera switch point in the multicam mode.
-
Operations to add, move, and delete camera switch point as well as to switch the selected camera can be controlled with this function.
1) Click [Mode] on the menu bar, and click [Multicam Switching] → an item.
|
[Cut Video] |
Set the track to be controlled with the camera switch point to the V track only. |
|
[Cut Audio] |
Set the track to be controlled with the camera switch point to the A track only. |
|
[Cut Video and Audio] |
Set the track to be controlled with the camera switch point to both of the V and A tracks. |
-
The current mode is displayed on the status bar of the timeline.

-
[Cut Video] is set by default.
-
If you add the buttons of [Multicam Switching] to be displayed on the mode bar and timeline as operation buttons, you can switch the track to be controlled with the camera switch point simply by clicking a button.
-
If you a assign keyboard shortcut to each item of [Multicam Switching], you can easily change the track to be controlled with the camera switch point.
Setting the Camera Switch Point
Set the camera switch point as the trigger to switch cameras.
-
Before performing an operation, check the setting of [Multicam Switching]. In [Multicam Switching], you can specify the track(s) to be controlled with the camera switch point.
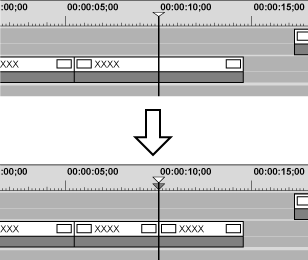
1) Move the timeline cursor to the position to set the camera switch point.
2) Right-click the time scale, and click [Add Cut Point/Clear Cut Point (Toggle)].
-
The camera switch point is set at the timeline cursor position, and a cut point is added to the clip on the switch point.
-
Repeat steps 1) and 2) , to set the camera switch point. The enable/disable setting of clips to use can be set by switching the selected camera.
 Alternative
-
Double-click the time scale at the position to set the camera switch point.
-
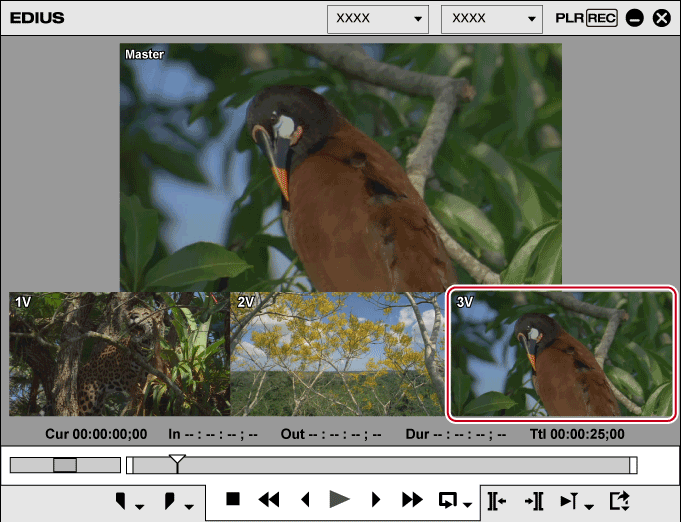
Double-click the camera video of each track.
-
Setting camera switch point: [0]
-
The same operations can also be performed during playback.
-
The track(s) to be switched when switching the camera will be determined according to the camera numbers specified on the V and A tracks.
Setting the Camera Switch Point during Playback
You can set the camera switch point during playback. Playback operations are the same as in the standard mode.
The following explains operations in the divided screen in the multicam mode. When display of only the selected camera in the single mode has been set, operate using the numerical keypad on the keyboard.
Multicam Editing by Shortcut Keys
-
Before performing an operation, check the setting of [Multicam Switching]. In [Multicam Switching], you can specify the track(s) to be controlled with the camera switch point.
1) Move the timeline cursor to the position to start playback.
2) Click the camera video of the clip to be enabled first.
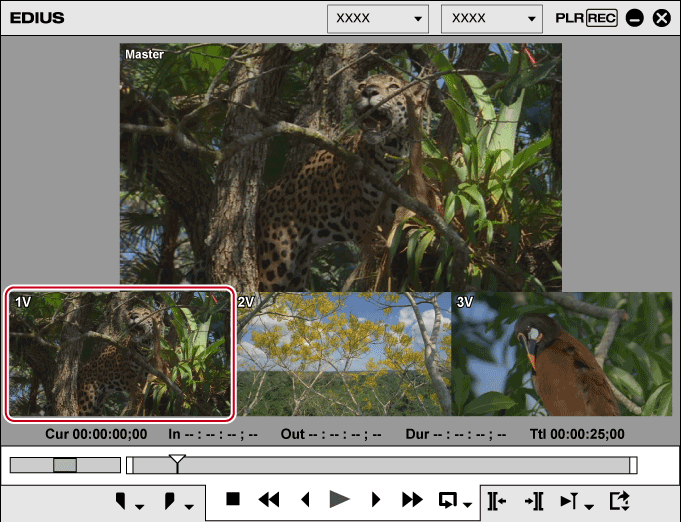
3) Click [Play] on the Recorder.
4) Click the camera video of the clip to be enabled at the video switching position.
-
The camera switch point is set to the timeline cursor position. When playback stops, a cut point is added to the clip on the camera switch point.
-
Any camera switch point which is placed between the first up to the playback stop point is deleted.
-
When setting the camera switch point during playback, you can set not to delete the camera switch points that playback has passed through. Click [Mode] on the menu bar, and click [Overwrite Cut Point] to uncheck the item.
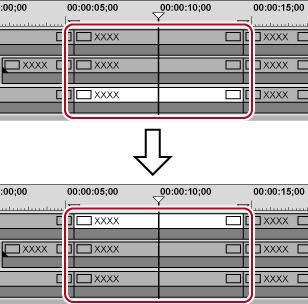
Moving Camera Switch Points
You can delete camera switch points.
-
Before performing an operation, check the setting of [Multicam Switching]. In [Multicam Switching], you can specify the track(s) to be controlled with the camera switch point.
1) Drag the camera switch point.
-
During dragging, the images of the previous and next frames of the camera switch point are displayed on the camera of the respective track on the Recorder.
Alternative
-
Click the clip boundary, and perform a slide trim.
-
Place the mouse cursor on the Recorder with [Shift] on the keyboard held down, and rotate the mouse wheel. The master at the position of the camera switch point being moved and the video of each track are displayed on the Recorder. Check the video, and release [Shift] at the position to place the camera switch point to place the point at the move destination.
-
If you have moved through other camera switch points, the camera switch points in between are deleted.
-
Move the camera switch point set to the Out point of a clip to trim the clip.
Deleting Camera Switch Points
You can delete camera switch points.
-
Before performing an operation, check the setting of [Multicam Switching]. In [Multicam Switching], you can specify the track(s) to be controlled with the camera switch point.
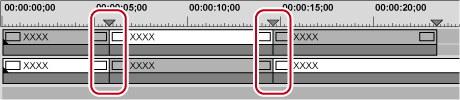
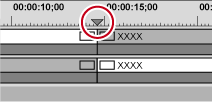
1) Move the timeline cursor to a camera switch point to delete.
2) Right-click the time scale, and click [Add Cut Point/Clear Cut Point (Toggle)].
-
The camera switch point is deleted, and clips are merged. The enable/disable settings of clips when a camera switch point is deleted are dependent on the previous clip.
The camera switch point cannot be deleted when the camera switch point set to the In and Out points of a clip which has no margin.
Alternative
-
Right-click the camera switch point to delete, and click [Add Cut Point/Clear Cut Point (Toggle)].
-
Double-click the camera switch point.
-
To delete all camera switch points on the time scale, right-click the time scale, and click [Delete All Cut Points].
-
To delete camera switch points between the In and Out points on the timeline, right-click the time scale, and click [Delete Cut Points between In/Out].
Switching the Selected Camera
You can change the clips to acquire after setting the camera switch points.
The following explains operations in the divided screen in the multicam mode. When display of only the selected camera in the single mode has been set, operate using the numerical keypad on the keyboard.
Multicam Editing by Shortcut Keys
-
Before performing an operation, check the setting of [Multicam Switching]. In [Multicam Switching], you can specify the track(s) to be controlled with the camera switch point.
1) Move the timeline cursor on the clip to switch the selected camera while the timeline is stopped.
2) Click the camera video to set as the selected camera from among the camera videos of each track.
-
The clips of the selected camera are enabled, and others are disabled.
When switching the selected camera of the clip at the timeline cursor position from [C1] to [C3]
-
When the timeline cursor is moved over the clip to switch the selected camera, and the camera video of each track currently displayed on the Recorder is double-clicked, the camera switch point can be set and the selected camera can be switched at the same time.
Multicam Editing by Shortcut Keys
You can set the camera switch point and selected the camera using the numeric keypad. When only the selected camera is displayed in the single mode, perform multicam editing using shortcut keys. The following shows shortcut key operations and camera numbers assigned to each key.
|
Camera No. |
Corresponding Numeric Keypad Operation |
|---|---|
|
1 |
[1] |
|
2 |
[2] |
|
3 |
[3] |
|
4 |
[4] |
|
5 |
[5] |
|
6 |
[6] |
|
7 |
[7] |
|
8 |
[8] |
|
9 |
[9] |
|
10 |
[Alt] + [0] |
|
11 |
[Alt] + [1] |
|
12 |
[Alt] + [2] |
|
13 |
[Alt] + [3] |
|
14 |
[Alt] + [4] |
|
15 |
[Alt] + [5] |
|
16 |
[Alt] + [6] |
Switching the Selected Camera Simultaneously with Setting of the Camera Switch Point
-
Before performing an operation, check the setting of [Multicam Switching]. In [Multicam Switching], you can specify the track(s) to be controlled with the camera switch point.
1) Move the timeline cursor to the point to switch the camera.
2) Press the numeric keypad corresponding to the camera to switch to with [Ctrl] on the keyboard held down.
Switching the Selected Camera Simultaneously with Setting of the Camera Switch Point during Playback
1) Play back the timeline, and press the numeric keypad corresponding to the camera selected at the time of switching.
-
The camera switch point is set to the timeline cursor, and the camera video is switched.
Switching the Selected Camera
1) Move the timeline cursor over the clip to switch the selected camera.
2) Press the numeric keypad corresponding to the camera to switch to.
Playing Back around the Camera Switch Point
You can playback around a camera switch point to confirm the video. You can also confirm video in the same way by regular playback operation.
1) Click the [Play the Current Area] list button on the Recorder.

2) Click the playback method.
|
[Play around Cut Point] |
Play back around the camera switch point which is nearest and placed before the timeline cursor. |
|
[Play around Cut Point (1 Sec)] |
Play back around for the specified length. |
|
[Play around Cut Point (2 Sec)] |
|
|
[Play around Cut Point (3 Sec)] |
|
|
[Play around Cut Point - Show only Selected Camera] |
Display only videos of the selected camera. Play back around the camera switch point which is nearest and placed before the timeline cursor. |
|
[Play around Cut Point (1 Sec) - Show only Selected Camera] |
Display only videos of the selected camera. Play back around for the specified length. |
|
[Play around Cut Point (2 Sec) - Show only Selected Camera] |
|
|
[Play around Cut Point (3 Sec) - Show only Selected Camera] |
-
You can repeatedly play back around the camera switch point.
-
You can set the preliminary operation time (Preroll) at [Preview] in [User Settings] → [Playback].
-
You cannot set the camera switch point while playing around a camera switch point. Set the camera switch point by regular playback operation.