Range-Restricted Effects/Multiple Filters
You can combine and set multiple video filters to one clip.
User preset effects or system preset effects are also available.
-
[Mask]
-
[Chrominance]
-
[Combine Filters]
-
[Blend Filters]
This section explains how to apply the mask filter for an example. For other filters, check the filter details in the description in the property, or by trying to apply the filter.
Mask Filter
You can apply a video filter to outside and inside of any range. You can also move the mask position in the key frame according to the video.
1) In the folder view of the [Effect] palette, click the [VideoFilters] tree and display the filters.
2) Drag and drop [Mask] to the clip on the timeline.
 Alternative
-
Select a clip on the timeline. Select [Mask] in the [Effect] palette, and click [Add to Timeline].
-
Select a clip on the timeline. Right-click [Mask] in the [Effect] palette, and click [Add to Timeline].
-
Select [Mask] in the [Effect] palette, right-drag it to the clip on the timeline, and click [Add].
-
Select [Mask] in the [Effect] palette, right-drag it to the clip on the timeline, and click [Paste] → [All].
3) Display the [Information] palette, and double-click [Mask].
-
The [Mask] dialog box appears.
4) Configure the mask and click [OK].
-
Clips with the mask specified are displayed with an orange line.
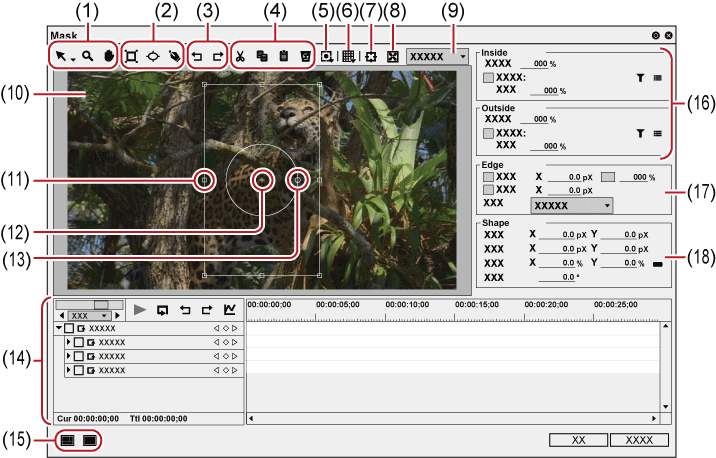
[Mask] Dialog Box
|
(1) |
Tool buttons |
|
|
(2) |
Drawing buttons |
|
|
(3) |
[Undo]/[Redo] |
|
|
(4) |
Edit buttons |
Cut, copy, paste, and delete a selected path. |
|
(5) |
[Tracking] |
Select a tracking method and start tracking. |
|
(6) |
Function menu |
[Apply Mask] Switch the enable/disable setting for mask temporarily. [Background] Switch the show/hide setting for the transparent grid if the transparency is set for outside and inside of the mask. [Motion Path] Switch the show/hide setting for the path if the position is changed by key frame and the setting is enabled. [Grid] Switch the show/hide setting for the grid. [Guide] Switch the show/hide setting for the underscan, overscan, title safe, horizontal/vertical center line. |
|
(7) |
[Centering] |
Center the display area which was moved by the pan tool. |
|
(8) |
[Fit] |
Fit the expanded/contracted display to the display range of the preview screen. |
|
(9) |
Zoom factor |
Change the zoom factor by entering a value or selecting a value from the list. |
|
(10) |
Preview |
Display a preview of the image being edited. Select a path to display a handle or anchor to modify the path. |
|
(11) |
Stretch handles |
Move the cursor to the operation handles at the corners and at the middle of the lines to zoom in and out the path. |
|
(12) |
Anchor |
Indicate the reference point of the path. This point is a reference point for the rotation center and for stretching. Drag with [Ctrl] on the keyboard held down to change the position. |
|
(13) |
Rotation handle |
Move the cursor and drag the rotation handle to rotate the image. |
|
(14) |
Key frame timeline |
Set a key frame to apply a movement to the mouse position. |
|
(15) |
Window layout |
Toggle the window layouts between [Normal], [Preview], and [Multi]. Select [Preview] to hide the parameters and key frame timeline to enlarge the preview. Select [Multi] for a multi-monitor view. * [Multi] option is not displayed for a single monitor system. |
|
(16) |
[Inside]/[Outside] |
Set video filters for outside and inside the path. [Opacity] Use these settings to configure the transparency inside and outside of the path. [Filter] Check this item to enable the video filters set inside and outside the path.
[Strength] The strength of video filter effects can be set. |
|
(17) |
[Edge] |
Use these settings to specify colors and blur to the path. If there are multiple paths, the edge settings are applied to all the paths. Individual setting is not allowed. [Color] Check this item to enable the color edge. Enter an edge width in [Width] in pixels. Click Color box to specify the edge color. Enter the edge transparency in percentage. [Soft] Check this item to blur the edge. Enter a blur width in [Width] in pixels. [Side] Apply the color and soft (blur) widths for outside and inside (or both) the path. |
|
(18) |
[Shape] |
For the selected path, change the various settings including the position by entering a value. You can select multiple paths to change in batch. To select multiple paths, click the paths or drag the mouse with [Shift] on the keyboard held down to enclose the paths. [Anchor] Specify the reference position of the path. With the path center as the origin, specify the anchor position by entering values to X and Y. [Position] Specify the path position. With the frame center as the origin, specify where to place the anchor position by entering values to X and Y. [Scale]
Enter a zoom factor for zoom in and out. Click
[Rotation] Enter an angle to rotate the image. |
 : Select or move the path. Dragging the handle can zoom in and out or rotate the path. Click the list button and select the shape edit tool to edit the path by dragging the path vertex or the handle.
 : Drag the mouse to expand or contract the screen. From the drag start point, drag to the right to expand the screen, and drag to the left to contract.
 : Drag the mouse to move the display area.
 : Drag the mouse to draw a rectangle. Drag the mouse with [Shift] on the keyboard held down to draw a square.
 : Drag the mouse to draw an ellipse. Drag the mouse with [Shift] on the key board held down to draw a circle.
 : Draw a free shape using Bezier curve.
 : Undo an operation.
 : Redo the undone operation.
 to enable or disable the fixed aspect ratio.

-
You can resize the [Mask] dialog box by moving the cursor to a corner or an edge of the dialog box and dragging the mouse when the cursor shape changes. You can also click [Maximize] to maximize the window size.
-
Move the cursor to the bottom of the preview window and drag the mouse when the cursor shape change to adjust the display area.
-
Right-click the preview to display a menu to select a tool or change the zoom factor. Right-click and click [Zoom] → [Fit] to fit the frame to the preview window. When you move the frame using the pan tool, right-click the frame and click [Centering] to place the frame to the center.
-
When the selected path or anchor is dragged while [Shift] on the keyboard held down, it can be moved limiting to X or Y axis.
-
Double-click the preview to add a key frame on the timeline cursor position when the parameter of the key frame setting is enabled.
Motion Tracking ([Mask])
This feature utilizes the mask function to automatically track specific parts of the subject in motion and apply [VideoFilters] effects such as [Mosaic].
Multiple paths can be tracked at the same time.
To apply [Mosaic] to the face of a person approaching
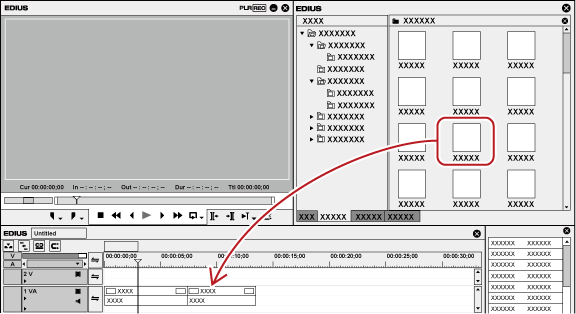
1) In the folder view of the [Effect] palette, click the [Effect] tree.
2) Click [VideoFilters].
-
A list of [VideoFilters] effects is displayed in the effect view.
3) Drag and drop [Mask] to the clip (video part) on the timeline.
-
Clips with the [Mask] effect applied (video part) are displayed with an orange line.
4) Display the [Information] palette, and double-click [Mask].
-
The [Mask] dialog box appears.
5) Move the timeline cursor to the top frame.
6) Click the draw button of ellipse and encircle the person's face with an ellipse.
7)
Check [Filter] for [Inside], click
 , and select [Mosaic].
-
Click
 to set the details of [Mosaic].
-
You can view the result of the applied video filter in the preview window.
8) Click [Track Forward] in [Tracking].
-
Tracking in the forward direction starts and a key frame will be set frame by frame. A progress bar is displayed to indicate the progress of the analysis.
-
Tracking will end automatically at the last frame of the clip.
9) Play back the timeline to view the video.
10) Click [OK].
-
The [Mask] dialog box is closed.
-
Set key frames can be adjusted frame by frame.
-
The unit of time scale display on the [Mask] dialog box can be adjusted in the time scale settings or by the time scale slider.
-
There are two types of interpolation methods, [Hold] and [Linear].
[Mask] Dialog Box (Motion Tracking)
|
(1) |
[Tracking] |
Select a tracking method and start tracking. Multiple paths can be tracked at the same time. |
|
(2) |
[Track Reverse] |
Tracks in the reverse direction from the timeline cursor position and sets key frames. Tracking will end automatically at the top frame of the clip. [Ctrl] + [,] |
|
(3) |
[Track Previous Frame] |
Tracks one frame in the reverse direction from the timeline cursor position and sets key frame. [,] |
|
(4) |
[Tracking Option] |
[Position] Tracks the position of the object. The default value is ON. [Scale] Tracks the size of the object. The default value is ON. [Rotation] Tracks the rotation of the object. The default value is ON. [Distortion] Tracks the distortion of the object (aspect ratio and shear). This item can be set only when [Position], [Scale] and [Rotation] are all set to ON. The default value is ON. |
|
(5) |
[Track Next Frame] |
Tracks one frame in the forward direction from the timeline cursor position and sets key frame. [.] |
|
(6) |
[Track Forward] |
Tracks in the forward direction from the timeline cursor position and sets key frames. Tracking will end automatically at the last frame of the clip. [Ctrl] + [.] |
Batch Tracking of Multiple Paths
You can select and track multiple paths at the same time.
1) Perform steps 1) to 7) in Motion Tracking ([Mask]) .
-
Draw multiple paths in advance.
2) While pressing [Shift] on the keyboard, select multiple paths.
3) Click [Tracking] on the tool bar, and click a tracking method.
-
Tracking for multiple paths starts at one time and finishes automatically at the last frame.
4) Play back the timeline to view the video.
If Automatic Tracking Has Been Disrupted
Tracking may be disrupted in the middle when an obstacle blocks the subject being tracked or when the motion is too fast.
This section explains how to set the key frames manually on the frames from the one where automatic tracking has been disrupted to the one where automatic tracking can be resumed.
You can also track in the reverse direction using [Track Reverse].
1) Perform steps 1) to 8) in Motion Tracking ([Mask]) .
-
Tracking has been disrupted in the middle. Automatic tracking cannot be continued. Set key frames manually up to the frame where automatic tracking can be resumed.
2) Set key frames manually.
-
To set a key frame frame by frame, click [Track Next Frame]. Adjust the path position and size as necessary.
-
To set a key frame at a desired position, move the timeline cursor to the position to set the key frame and then adjust the path position and size. A key frame is added automatically when you edit the path. Repeat this step as necessary.
-
To delete key frames collectively, drag the mouse upward to select the key frames and press [Delete] on the keyboard.
3) Move the timeline cursor to the position to start automatic tracking, and click [Track Forward] again.
-
Automatic tracking resumes.
4) Play back the timeline to view the video.
5) Click [OK].
-
The [Mask] dialog box is closed.