Adjusting Position of Text Object

-
EDIUS can be used to configure the layout of a title clip.
Moving a Text Object
You can move a text object.
1) Click a text object and, after the mouse cursor changes shape, drag it.

Changing by Entering Values
You can specify the position from [Transform] on the properties bar.
1) Select a text object and enter values for [X] and [Y].
Aligning a Text Object
You can align text objects.
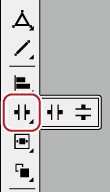
Alignment to the Vertical/Horizontal Center
1) Select the text objects to be aligned.
-
Multiple text objects can be selected with the selection tool by clicking them while holding down the [Ctrl] key on the keyboard.
2) Click [Center (vertically)] or [Center (horizontally)] on the object tool bar.
 Alternative
-
Click [Layout] on the Quick Titler menu bar, and click [Center in screen] → [Vertical] or [Horizontal].
-
Right-click a text object, and click [Layout] → [Center in screen] → [Vertical] or [Horizontal].
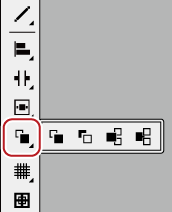
Alignment to a Reference Text Object
1) Select the text objects to be aligned.
-
Multiple text objects can be selected with the selection tool by clicking them while holding down the [Ctrl] key on the keyboard.
2) Right-click the text object, click [Next Object] and then select a text object to be used as a reference for alignment.
-
The text object with an operation handle displayed at its border is the selected text object (active object).
-
You can switch the active object by clicking [Next Object].
3) Click [Left Tab] on the object tool bar.
-
If you click and hold down [Left Tab], you can select between [Right Tab], [Top], [Bottom], [Center (vertically)] and [Center (horizontally)].
 Alternative
-
Click [Layout] on the Quick Titler menu bar, and click [Align] → an item.
-
Right-click a text object, and click [Layout] → [Align] → an item.
-
When multiple text objects are selected, you can apply Align Left, Align Right, Align Top, Align Bottom, Align Center (vertically), and Align Center (horizontally).
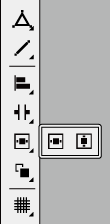
Uniform Horizontal/Vertical Alignment
1) Select the text objects to be aligned.
-
Multiple text objects can be selected with the selection tool by clicking them while holding down the [Ctrl] key on the keyboard.
2) Click [Align at top and bottom] on the object tool bar.
-
If you click and hold down [Align at top and bottom], you can select [Align at right and left].
 Alternative
-
Click [Layout] on the Quick Titler menu bar, and click [Same space] → an item.
-
Right-click a text object, and click [Layout] → [Same space] → an item.
-
Align vertically and align horizontally can be applied when 3 or more text objects are selected.
Layout Settings
You can align text and objects to fit the center, title safe area or overscan area.
1) Show the layout bar.
2) Select a text object and then click where to place it using the layout bar.
-
Multiple text objects can be selected with the selection tool by clicking them while holding down the [Ctrl] key on the keyboard.

|
(1) |
Overscan |
|
|
(2) |
Title safe area |
|
|
(3) |
Center |
|
Switching the Order of Text Objects
You can switch the order of text and objects.
1) Select the text and objects you want to switch the order of.
2) Click [Front] on the object tool bar.
-
If you click and hold down [Front], you can select [Back], [Move to Top] or [Move to Bottom].
 Alternative
-
Click [Layout] on the Quick Titler menu bar, and click [Order] → an item.
-
Right-click a text object, and click [Layout] → [Order] → an item.
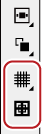
Showing/Hiding Grid and Safe Area
You can display a grid or safe area on the object creating screen to use as a guide when moving text objects.
1) Click [Line Grid] or [Title Safe Area] on the object tool bar.
-
If you click and hold down [Line Grid], you can select [Dot Grid].
 Alternative
-
Click [View] on the Quick Titler menu bar, and click [Grid] → [Dot Grid] or [Line Grid].
-
Click [View] on the Quick Titler menu bar, and click [Title Safe Area].
-
If Quick Titler starts up from EDIUS, the 4:3 title safe area will also be displayed when [4:3] for the 16:9 screen guide line is set to be displayed through [Preview] in [User Settings] → [Overlay].
Displaying a Background
You can import EDIUS Recorder images or any still images to be the background of the object creating screen to use as a guide when positioning text objects.
Clicking the background will display the background properties.
1) Click the [Background] tree on the background properties bar, and then select an item to be displayed as background.
-
If you have selected [Still Image], click [...] and select a still image in the [Select Background File] dialog box.
-
Even if a background is set as the background in the background properties of QuickTitler, the background is not used in the title clip. The background set in the background properties is available as the background for the edit screen. To output an edited title with a background, export a still image.