Adjusting the Volume and Pan of a Clip
Adding a Rubber Band Point
Two rubber bands are displayed on audio clips placed on the timeline; a volume rubber band (orange line) used to adjust volume and a pan rubber band (blue line) used to change the L/R stereo balance. Rubber band points can be added to adjust the shape of the rubber band.
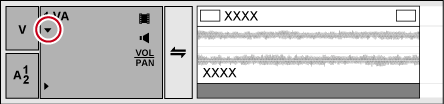
1) Click the expand button for the audio on the track panel.
-
The track expands and the rubber band and the waveform are displayed. For stereo audio, a waveform is displayed in each channel.
 Alternative
-
Expanded display of audio: [Alt] + [S]
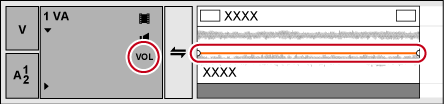
2) Click [Volume/Pan].
-
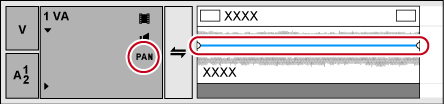
Clicking it switches between Volume, Pan and Lock.
3) Click on a rubber band in the position where you want to apply a change.
-
A point is added that is used to adjust the volume or pan.
Alternative
-
Right-click a rubber band in the position you want to add a point, then click [Add/Delete].
Volume/Pan Rubber Band
Volume rubber band (orange line)
Pan rubber band (blue line)
Adjusting the Rubber Band
You can adjust the volume and pan of a clip. You can also adjust the volume and the pan along to the time axis by adjusting the shape of the relevant rubber band.
Adjusting Using a Point
1) Display the volume rubber band or the pan rubber band, and add a rubber band point.
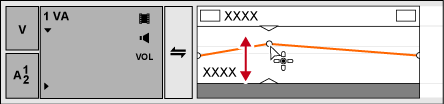
2) Drag the point vertically or horizontally.
-
Fine adjustments can be made by dragging the point with [Ctrl] on the keyboard held down.
-
You can adjust the whole rubber band by dragging the point with [Alt] on the keyboard held down.
For volume points
Drag a point upwards to increase the volume, and downwards to decrease the volume.
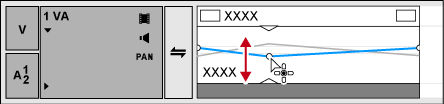
For pan points
Drag a point upwards or downloads to adjust the L/R balance of the stereo. Drag the point upward to spread the sound to the left side, and downward to spread the sound to the right side.
Adjusting between 2 Points
1) Display the volume rubber band or the pan rubber band, and add a rubber band point.
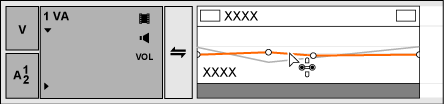
2) Drag the rubber band between 2 points up or down with [Shift] on the keyboard held down.
-
The pointer shape will change to shift the rubber band up or down between the 2 points.
-
Fine adjustments can be made by dragging with [Shift] + [Ctrl] on the keyboard held down.
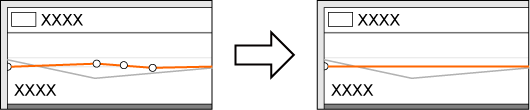
Also, by dragging with [Alt] on the keyboard held down, you can automatically add a new point between the 2 other points and move it in parallel. You can set how many frames within 2 points at either end an automatically added point is placed using [Source] in [User Settings] → [Duration].
Adjusting a Whole Rubber Band
1) Display the volume rubber band or the pan rubber band.
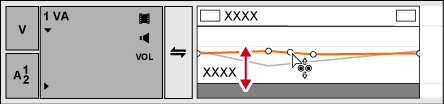
2) Drag a rubber band or rubber band point up or down with [Shift] + [Alt] on the keyboard held down.
-
The pointer shape will change and the whole rubber band can be adjusted.
-
All other other points will move proportionately according to the amount the selected rubber band or point is varied.
-
Fine adjustments can be made by dragging with [Ctrl] on the keyboard held down.
Adjusting by Entering Values
You can adjust a rubber band by entering values.
1) Display the volume rubber band or the pan rubber band.
2) Right-click a rubber band point, and click a method by which to adjust.
|
[Move] |
Adjust the volume or timecode of a selected point. |
|
[Move two aligning points] |
Move the rubber band that is between a selected point and the next point to the right of the selected point horizontally and in proportion according to the amount the selected point is varied. |
|
[Add points and move] |
Add 2 new points between the selected point and the next point to the right, and move the rubber band between the 2 added points horizontally and in proportion according to the amount the 2 added points are varied. |
|
[Move All] |
Move other points in proportion according to the amount the selected point is varied. |
|
[Move All On Scale] |
Adjust the volume of all points proportionally. [Shift] + [Alt] + [Y] |
-
The value input dialog box appears.
3) Enter values.
4) Click [OK].
Setting the Pan Rubber Band to the Center
The sound level can be adjusted to make L/R equal.
1) Display the pan rubber band.
2) Right-click the pan rubber band, and click [Center].
-
All rubber band points are deleted and the rubber band is centered.
-
Clicking [L] or [R] will delete all rubber band points and adjust the rubber band to L or R.
Initializing/Deleting Rubber Band Points
You can delete or initialize a specific rubber band.
Deleting All Rubber Band Points in a Clip
1) Display the volume rubber band or the pan rubber band.
2) Right-click the rubber band, and click [Delete All].
-
All points are deleted and the entire rubber band is initialized.
For [Volume]
 Alternative
-
Right-click a clip, and click [Delete Parts] → [Audio Rubber Band] → [Volume] or [Pan].
-
Select a clip, click [Edit] on the menu bar, and click [Delete Parts] → [Audio Rubber Band] → [Volume] or [Pan].
-
Deleting a volume rubber band: [Shift] + [Alt] + [H]
-
Deleting a pan rubber band: [Ctrl] + [Alt] + [H]

-
The following procedures initialize only the position of a rubber band, leaving rubber band points in place on the rubber band.
-
Right-click a rubber band, and click [Initialize All].
-
Initializing rubber band: [Shift] + [Ctrl] + [U] (Perform procedure after selecting the desired rubber band.)
-
Deleting a Selected Rubber Band Point
1) Display the volume rubber band or the pan rubber band.
2) Right-click a rubber band point, and click [Add/Delete].
Alternative
-
Select a rubber band point and press [Delete] on the keyboard.