Setting External Device Used for Preview
Registers and manages hardware as preview device when editing while viewing an external monitor connected to the PC.

-
Setting other than for EDIUS may be required depending on the type of hardware. For details, visit our website.
Setting Preview Devices
Before setting preview devices, connect the external device (e.g. monitor) used for preview to the PC, and turn on the power.
For more information on settings when using a Grass Valley product as a preview device, see the user manual included with the product.
1) Click [Settings] on the menu bar, and click [System Settings].
|
|
|---|
|

2) Click the [Hardware] tree, and click [Preview Device].
3) Set each item.
|
Preview device list |
Displays a list of preview devices. Click the preview device to use, and the device name will be prefixed with a check mark. You can also uncheck preview devices not in use. You can set the details of each device by clicking [Settings]. For more information on settings when using a Grass Valley product, see the user manual included with the product. |
|
[Use Pulldown Format when Available] |
Check this item to give priority to pulldown operation (2-3-2-3) regardless of the [Pulldown Type] setting in the current project settings. Try this setting when using a monitor that does not support 23.98p/29.97p/25p display. |
|
[Display a warning message when the selected device does not support the current format] |
When a preview device is not compatible with the video format in the current project settings, an alarm message will be displayed. When this item is unchecked, an alarm message will not be displayed. |
|
[Release device when EDIUS is inactive] |
Check this item to release the video hardware when EDIUS is not active. Even if [Release device when EDIUS is inactive] is enabled, the video hardware is not released while in the following statuses.
|
|
|
|---|
|
4) Click [OK].
-
You can continue to set other items by clicking [Apply].
|
|
|---|
|
Checking Conversion Status of Output Video
The conversion status of output video can be checked with the icon indicated on the status bar of the timeline.
-
Moving the mouse cursor onto the icon will show the tooltip indicating the preview device in use and output format.
When video is output without conversion
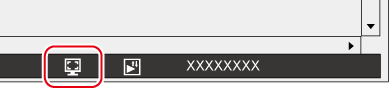
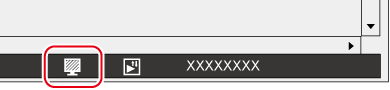
When video is not output from the hardware
The tooltip that appears when the mouse cursor is placed on the icon indicates the output format [None].
-
While a video is being converted and output, the preview device in use and output format are indicated over the icon.