Changing the Display of Preview Window
The following explains how to change the display of the preview window.
Switching Between Single Mode/Dual Mode
You can switch the preview window between the single mode or dual mode.
1) Click [View] on the menu bar, and click [Single Mode] or [Dual Mode].
-
The display of the preview window switches to single or dual mode.

-
To switch between the Player and Recorder in the single mode, click [Change to Player] or [Change to Recorder].

-
You can switch between the Player and Recorder by the following shortcut keys:
-
Switching to the Player: [Ctrl] + [Alt] + [P]
-
Switching to the Recorder: [Ctrl] + [Alt] + [R]
-
Switching to the Player/Recorder: [Tab]
-
Full Screen View of Preview Window
Video displayed in the preview window can be displayed in full screen view.
Assign in advance which video, such as Player or Recorder video, or video from a selected camera in the multicam mode, is to be displayed in full screen view on each monitor connected to your PC.
|
|
|---|
|
1) Click [View] on the menu bar, and click [Full Screen Preview] → monitor number.
-
When [All] is clicked, all monitors that have been set to full screen view at [Preview] in [User Settings] → [Monitor] can be displayed as full screen view.
 Alternative
-
Double-click the preview window.

-
Perform the following to cancel full screen view:
-
Click [View] on the menu bar, and click [Full Screen Preview] → monitor number.
-
Double-click the monitor set to full screen view.
-
Rotation Display of Preview Window
The preview window can be displayed rotated by 90 degrees.
1) Click [View] on the menu bar, and click [Rotate Preview] → [Right 90 Degrees] or [Left 90 Degrees].

-
Click [View] on the menu bar, and click [Rotate Preview] → [Standard] to return the window to its original state.
-
Rotation of the preview can be set to each individual sequence. To maintain rotation of the preview when a project is next opened, set rotation of the preview as desired to each sequence, and then save the project.
-
When a new project or sequence is created, the orientation of the preview window will be standard (i.e. rotation off).
Showing/Hiding Preview Window
Switch the show/hide setting for the safe area, center, and zebra preview.
You can change the information display settings from [Preview] in [User Settings] → [Overlay].
1) Click [View] on the menu bar, and click [Overlay] → an item to display.
-
The selected information is displayed in the preview window.
Player
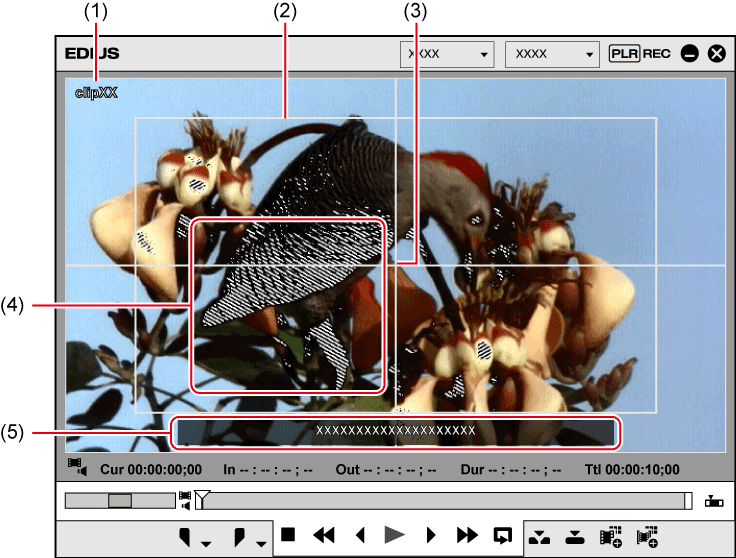
|
(1) |
Clip/device name (capturing)/reel name (capturing) |
|
|
(2) |
Safe area |
|
|
(3) |
Center |
|
|
(4) |
Zebra preview |
|
|
(5) |
Marker comment display |
|
 Alternative
-
Showing/hiding safe area: [Ctrl] + [H]
-
Showing/hiding center: [Shift] + [H]

-
When [Marker] is selected as a display item, the clip marker comment is displayed on the Player only when the slider is directly above the clip marker. Also, on the Recorder, the sequence marker list is displayed only when the timeline cursor is directly above the sequence marker. Note, however, that these are not displayed during playback.
Showing/Hiding Status Area
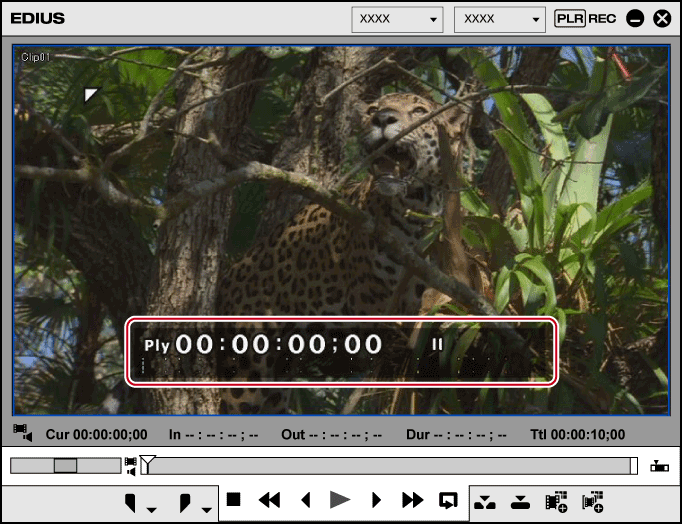
Switch the show/hide setting for the status area.
-
You can change the settings of items displayed in the status area from [Preview] in [User Settings] → [On Screen Display].
The source information can also be changed from [View] → [Source Information] on the menu bar.
1) Click [View] on the menu bar, and click [On Screen Display] → [Status].
-
Select whether to display the status area not only on the PC screen but also on the external monitor. Click [View] on the menu bar, and click [On Screen Display] → [PC Monitor/External Output] or [PC Monitor].
Player

-
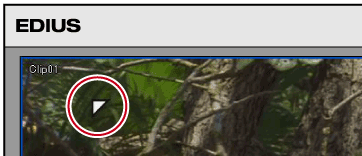
When the status bar is displayed, a white triangle indicating the start or end frame is also displayed at the upper left or upper right corner of the safe area.
 Alternative
-
Showing/hiding status area: [Ctrl] + [G]
Source Information Display
You can set information of sources to be displayed on the source timecode in the status area.
For captured clips, information such as recording date can be displayed.

-
To display source timecode in the status area, go to [User Settings] → [Preview] → [On Screen Display], and check [Source Information] for [Show Normal Edit]/[Show Trim]/[Show Export].
1) Click [View] on the menu bar, and click [Source Information] → the item to display.
-
The selected information are displayed on the source timecode in the status area.
-
A check mark appears on the selected item.

-
Selecting [Timecode/User Bit (Timecode)] enables simultaneous on-screen display of timeline timecode, source timecode, and user bit.
-
The [Source Information] setting is linked with the setting of [User Settings] → [Preview] → [On Screen Display] → [Select Source Information].
 Alternative
-
Simultaneous on-screen display of timeline timecode, source timecode, and user bit: [Ctrl] + [Alt] + [Enter]
Showing/Hiding Closed Caption
Switch the show/hide setting for closed caption.
The settings of closed caption can be changed in the [Closed Caption Settings] dialog box.
Setting Closed Caption Display
1) Click [View] on the menu bar, and click [On Screen Display] → [Closed Caption] → [On/Off].
-
When this menu item is checked, closed caption is displayed.
-
Select whether to display on not just the PC screen but also the external monitor. Click [View] on the menu bar, and click [On Screen Display] → [PC Monitor/External Output] or [PC Monitor].

-
Closed caption is displayed within the [Title Safe] area.
-
Closed caption display supports MXF format files.
-
Closed caption is only displayed during playback.
-
Closed caption is only displayed when the settings including [Frame Size], [Frame Rate], and [Aspect Ratio] in the project settings match those of the source format.
-
If [Closed Caption On/Off] is displayed on the Player or Recorder as an operation button, you can switch show/hide setting of closed caption simply by clicking the button.
-
Import of closed caption files is supported.
-
A sidecar file (closed caption file) can be exported besides an output file, or closed caption data can be embedded into the output file. The closed caption of a project alone can be exported as well.
Setting Closed Caption Display
Set display of the closed caption.
1) Click [View] on the menu bar, and click [On Screen Display] → [Closed Caption] → [Settings].
-
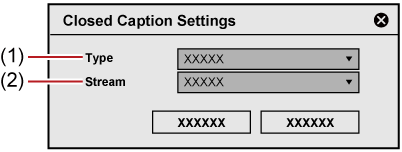
The [Closed Caption Settings] dialog box appears.
2) Set each item and click [OK].
[Closed Caption Settings] dialog box
|
(1) |
[Type] |
Select the closed caption standard from [CEA-708] and [CEA-608]. |
|
(2) |
[Stream] |
Set the type of the closed caption. When [CEA-708] is selected for [Type], select an item from [Service 1] to [Service 6]. When [CEA-608] is selected for [Type], select [CC1] or [CC3]. |
Control Area Settings
You can set the display item or the size of the timecode/shuttle/slider/buttons.
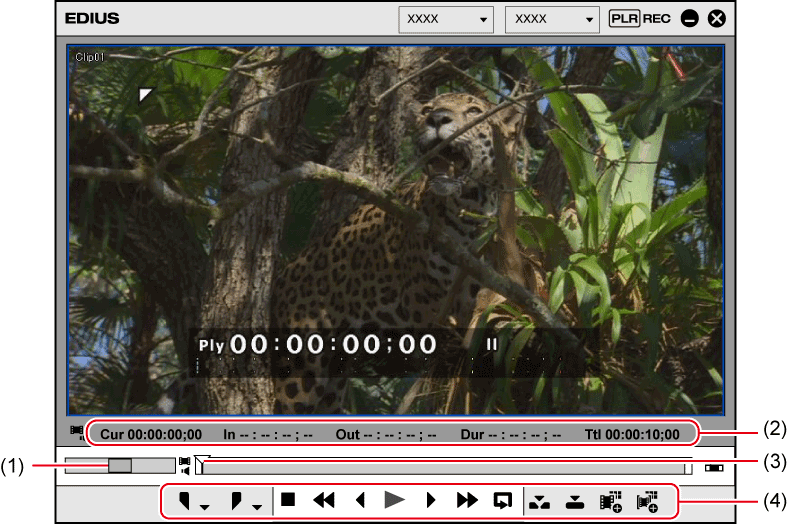
|
(1) |
Shuttle |
|
|
(2) |
Timecode |
|
|
(3) |
Slider |
|
|
(4) |
Button |
|
1) Click [Settings] on the menu bar, and click [User Settings].
-
The [User Settings] dialog box appears.
2) Click the [User Interface] tree, and click [Control].
3) Set each item.
|
[Show Timecode] |
Check the timecode items to display in the preview window, and set their size. |
|
[Shuttle/Slider] |
Set the show/hide setting for the shuttle and slider in the preview window. |
|
[Button] |
Set the show/hide setting and the size of the operation buttons on the preview window. |
4) Click [OK].
-
You can continue to set other items by clicking [Apply].
Switching the Screen Display when Stopping Playback
You can switch the display of the preview window to each field when playback is stopped.
1) Click [View] on the menu bar, and click [Pause Field] → display method.
Showing/Hiding Alpha Channel
Turn the video with alpha channel to gray scale and display in the preview window.
1) Click [View] on the menu bar, and click [Show Alpha Channel].
