Smooth Playback
If multiple effects and titles has been added, real time processing may not catch up the timeline playback.
This real time processing is delayed due to the heavy data loaded on the playback operation. While playback is performed, the lines of the parts where rendering is required are displayed in red (overloaded) or in orange (loaded).
Performing rendering enables smoother playback.
Color Coding of Time Scale
Realtime processing sometimes cannot keep up when playing back a timeline. The line of the part judged as requiring rendering when playing back changes color.
The line colors indicate the following states.

|
Line color |
Timeline state |
|---|---|
|
No line |
No clip exists. |
|
Blue |
A clip matching the project settings is placed. |
|
Light blue |
Playback is keeping up. (Rendering is sometimes required.) |
|
Orange |
Rendering option (load area) |
|
Red |
Rendering is required (overload area). |
|
Pink |
Rendering job has already been registered to the Render Service, or rendering is in process in the background. |
|
Green |
Already rendered |

-
Rendering is judged based on the remaining buffer set by [Application] in [System Settings] → [Render], and a red line is displayed for overload areas when the remaining buffer is less than the preset value.
-
When data such as CG animation has been placed on the timeline by one frame at a time as consecutive still images, rendering the range will not lighten the load of playback processing. In this case, use the [Render and Add to Timeline] item to replace with the exported clip.
-
Rendering is enabled even if the clip becomes out-of-position by a ripple delete, for example.
-
In the following cases, the color of the line of the time scale returns to the state before the rendering process started.
-
The rendering job has been canceled by operation from GV Job Monitor.
-
The rendering process has failed.
-
|
|
|---|
|

Rendering Overload Areas of the Entire Sequence
Render all the areas that are judged as overload (red) in the entire sequence.
1) Click the [Render In/Out (Render Overload Area)] list button on the timeline.

2) Click [Render Sequence] → [Render Overload Area].
-
The rendering job will be registered to the Render Service, and the color of the line of the time scale changes to pink.
Registered rendering jobs are processed in the background in a sequential order of the predetermined priority. The progress of the rendering process can be checked on GV Job Monitor.
-
Even if the project file is closed before the rendering process is completed, the process of the rendering job will be continued.
-
When the rendering process has been completed, the color of the line of the time scale changes to green.
 Alternative
-
Click [Render] on the menu bar, and click [Render Sequence] → [Render Red Area].
-
Rendering overload areas on the entire sequence: [Shift] + [Ctrl] + [Q]
-
Overload (red) and load (orange) areas on the entire sequence can be rendered at a time by the following operation.
-
Click the [Render In/Out (Render Overload Area)] list button, and click [Render All] → [Render Loaded Area].
-
Click [Render] on the menu bar, and click [Render Sequence] → [Render Orange Area].
-
Rendering (load areas) on the entire sequence: [Shift] + [Ctrl] + [Alt] + [Q]
-
-
When In and Out points have been set on the timeline, only the range between the In and Out points can be rendered.
-
After rendering process has started, if the project is edited in a way that the range to be rendered changes, the rendering job will be canceled.
Rendering Overload Areas in the Entire Project
Render all areas that are judged as overload (red) in the entire project that comprises multiple sequences.
1) Click [Render] on the menu bar, and click [Render Entire Project] → [Render Red Area].
-
The rendering job will be registered to the Render Service, and the color of the line of the time scale changes to pink.
Registered rendering jobs are processed in the background in a sequential order of the predetermined priority. The progress of the rendering process can be checked on GV Job Monitor.
-
Even if the project file is closed before the rendering process is completed, the process of the rendering job will be continued.
-
When the rendering process has been completed, the color of the line of the time scale changes to green.
-
Overload (red) and load (yellow) areas in the entire project can be rendered at a time. Click [Render] on the menu bar, and click [Render Entire Project] → [Render Orange Area].
-
After rendering process has started, if the project is edited in a way that the range to be rendered changes, the rendering job will be canceled.
Rendering only Overload/Load Areas
Render only the areas that are judged as overload (red) or load (orange).
1) Right-click the line of overload (red) or load (orange) areas on the time scale, and click [Render].
-
The rendering job will be registered to the Render Service, and the color of the line of the time scale changes to pink.
Registered rendering jobs are processed in the background in a sequential order of the predetermined priority. The progress of the rendering process can be checked on GV Job Monitor.
-
Even if the project file is closed before the rendering process is completed, the process of the rendering job will be continued.
-
When the rendering process has been completed, the color of the line of the time scale changes to green.
-
After rendering process has started, if the project is edited in a way that the range to be rendered changes, the rendering job will be canceled.
Rendering Overload Areas between In and Out Points
Render areas judged as overload (red) between In and Out points on the timeline.
1) Setting the In and Out Points to the Timeline
2) Click [Render In/Out (Render Overload Area)] on the timeline.

-
The rendering job will be registered to the Render Service, and the color of the line of the time scale changes to pink.
Registered rendering jobs are processed in the background in a sequential order of the predetermined priority. The progress of the rendering process can be checked on GV Job Monitor.
-
Even if the project file is closed before the rendering process is completed, the process of the rendering job will be continued.
-
When the rendering process has been completed, the color of the line of the time scale changes to green.
Alternative
-
Click [Render] on the menu bar, and click [Render In/Out] → [Render Red Area].
-
Click the [Render In/Out (Render Overload Area)] list button, and click [Render In/Out] → [Render Overload Area].
-
Right-click the time scale, and click [Render In/Out] → [Render Overload Area].
-
Rendering overload areas between In and Out points: [Ctrl] + [Q]
-
All areas judged to be red, orange and light blue between In and Out points can be rendered by the following operation.
-
Click [Render] on the menu bar, and click [Render In/Out] → [All].
-
Click the [Render In/Out] list button, and click [Render In/Out] → [All].
-
Right-click the time scale, and click [Render In/Out] → [All].
-
Rendering between In and Out points (all): [Shift] + [Alt] + [Q]
-
-
Overload (red) and load (orange) areas between In and Out points can be rendered at a time by the following operation.
-
Click [Render] on the menu bar, and click [Render In/Out] → [Render Orange Area].
-
Click the [Render In/Out (Render Overload Area)] list button, and click [Render In/Out] → [Render Loaded Area].
-
Right-click the time scale, and click [Render In/Out] → [Render Loaded Area].
-
Rendering between In and Out points (load area): [Ctrl] + [Alt] + [Q]
-
-
After rendering process has started, if the project is edited in a way that the range to be rendered changes, the rendering job will be canceled.
Rendering Around the Timeline Cursor Position
Render only overload areas (red) or load areas (orange) around the timeline cursor position.
1) Move the timeline cursor to the area to be rendered.
2) Click [Render] on the menu bar, and click [Render Cursor Area].
-
The rendering job will be registered to the Render Service, and the color of the line of the time scale changes to pink.
Registered rendering jobs are processed in the background in a sequential order of the predetermined priority. The progress of the rendering process can be checked on GV Job Monitor.
-
Areas of the same line color on the time scale are rendered around the timeline cursor position. When there is a transition in same-color lines, the rendered area becomes the area up to the In or Out point of the transition.
-
Even if the project file is closed before the rendering process is completed, the process of the rendering job will be continued.
-
When the rendering process has been completed, the color of the line of the time scale changes to green.

-
After rendering process has started, if the project is edited in a way that the range to be rendered changes, the rendering job will be canceled.
Rendering Clips/Transitions
Perform rendering in individual clip or transition units.
|
|
|---|
|
1) Right-click the clip to be rendered, and click [Render].
-
To render a transition, right-click the transition and click [Render].
-
The rendering job will be registered to the Render Service, and pink lines appear on the clip.
When a transition has been rendered, the lines at the center of the transition change to pink.
Registered rendering jobs are processed in the background in a sequential order of the predetermined priority. The progress of the rendering process can be checked on GV Job Monitor.
-
Even if the project file is closed before the rendering process is completed, the process of the rendering job will be continued.
-
When the rendering process has been completed, the lines on the clip change to green.
When a transition has been rendered, the lines at the center of the transition change to green.
When a clip has been rendered

When a clip transition has been rendered
 Alternative
-
Click [Render] on the menu bar, and click [Render selected clip/transitions].
-
Rendering clips/transitions: [Shift] + [G]
-
If the clip or transition to be rendered is edited after rendering process has started, the rendering job may be canceled.
Exporting Video Clips from Timeline
Render between In and Out points on the timeline, and export only video clips as a file in AVI format. Exported clips are placed on the V/VA track.
1) Set the range of the clip to export from the timeline with the In and Out points.
2) Click the [Render In/Out (Render Overload Area)] list button on the timeline.
3) Click [Render and Add to Timeline].
-
The rendering job will be registered to the Render Service.
An offline clip is placed on the V/VA track on the timeline, and a pink line appears on the clip. If there is no space to place a clip on the track, a new V track is added.

-
Registered rendering jobs are processed in the background in a sequential order of the predetermined priority. The progress of the rendering process can be checked on GV Job Monitor.
-
Even if the project file is closed before the rendering process is completed, the process of the rendering job will be continued.
-
When the rendering process has completed, the offline clip changes into an online clip, and the pink line on the clip disappears.
Alternative
-
Click [Render] on the menu bar, and click [Render and Add to Timeline].
-
Right-click the time scale, and click [Render and Add to Timeline].
-
Exporting video clips from the timeline: [Shift] + [Q]
-
The exported clips are saved in the “RenderAndPaste” folder in the project folder by default. When the “RenderAndPaste” folder increases in size, delete the files manually.
-
You can set the save destination of exported files from [User Settings] → [Application] → [Project] → [Rendered File].
-
Once a rendering process has started, the rendering job will not be canceled even if the project is edited. To cancel a rendering job, use GV Job Monitor.
|
|
|---|
|
Manually Deleting Temporary Files
Manually delete temporary files that are created during rendering.
By default, temporary files for rendering are temporarily saved in the “rendered” folder created in the project folder. Temporary files that are not referenced by a project are automatically deleted when the project ends, however, it is recommended to manually delete them when the “rendered” folder increases in size.
-
You can set the save destination of temporary files from [User Settings] → [Application] → [Project] → [Rendered File].
1) Click the [Render In/Out (Render Overload Area)] list button on the timeline.
2) Select [Delete Render Files] and click [Files that are not Used] or [All Files].
Alternative
-
Click [Render] on the menu bar, and click [Delete Temporary Render Files] → [Files Not Used] or [All Files].
-
Deleting unused files: [Alt] + [Q]
3) Click [Yes].
-
Set when to automatically delete invalid rendering files (i.e. files not referenced by a project) at [Application] in [System Settings] → [Render].
-
A temporary file is created in the following cases:
-
When a clip has been exported from the timeline
-
When whole or part of the timeline has been rendered
-
When a clip has been rendered
-
-
Files created by [Render and Add to Timeline] and saved in the “RenderAndPaste” folder will not be deleted even if [Delete Render Files] is executed. In case there is a shortage of capacity of the “RenderAndPaste” folder, delete the files manually.
|
|
|---|
|
Exporting Still Image Clips from the Timeline
Video images in the selected preview window (Player/Recorder) can be exported as still image clips and registered to the bin.
To export the frame displayed on the Recorder as a still image
1) On the Recorder, display frames to be saved as still images.
2) Click [Create a Still Image (Save as)] on the timeline.

-
The [Save As] dialog box appears.
3) Set a file name, save destination, and [Save as type], and then click [Save].
-
The still image is saved in the specified folder, and the still image clip is registered to the bin.
Alternative
-
Exporting still image clips from the timeline: [Ctrl] + [T]
-
Click [Clip] on the menu bar, and click [Create a Still Image]. The still image is saved in the same folder as the project, and the still image clip is registered to the bin.
-
Video from a deck also can be saved as still image clips.
-
The aspect ratio of still images sometimes is output different from that of the original image depending on the frame size. To output correctly, set to correct the aspect ratio. The settings of still images to export can be changed by [Importer/Exporter] in [System Settings] → [Still Image].
Draft Preview
Reducing image resolution or bit depth for preview improves the performance of real time playback. Although the preview image quality becomes lower, it reduces the load on PC and you can edit data comfortably.
Make use of this feature when you apply heavy-load effects such as [Mask] and [Layouter], or when you play the timeline where high-resolution clips such as 4K are placed.
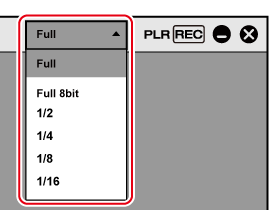
1) Click [Preview Quality] on the menu bar, and select an item.
-
The image quality for preview will be changed according to the selected item.
|
[Full] |
Previews video without changing the resolution and bit depth. |
|
[Full 8bit] |
Previews video with the original resolution maintained but with the bit depth changed to 8 -bit. This is displayed only for projects with video quantization bitrate of 10 -bit. |
|
[1/2] |
Previews video in 1/2 of the original resolution. |
|
[1/4] |
Previews video in 1/4 of the original resolution. |
|
[1/8] |
Previews video in 1/8 of the original resolution. |
|
[1/16] |
Previews video in 1/16 of the original resolution. |
-
Click [Settings] on the menu bar, go through [User Settings] → [Preview] → [Playback], and add the check mark for [Show full quality when Paused], to enable preview in the original image quality when playback is paused.
-
When proxy editing is started while [Preview Quality] is set to [Full] or [Full 8bit], the setting is automatically changed to [1/2]. When proxy editing is started while [Preview Quality] is set to lower than [1/2], the setting is maintained. After proxy editing is finished, [Full] is applied for [Preview Quality], regardless of the original setting.
|
|
|---|
|
Playing Back Video with Effects Applied Smoothly
When heavy-load effects such as [Mask] or [Layouter] are applied on a clip, real time processing may not catch up and the timeline may not be played back smoothly.
Draft preview can be used in such a case. Although the preview image quality becomes lower, it does not take time for converting resolution or bit depth, and the timeline can be played back quickly. If you need to check image details, adding the check mark for [Show full quality when Paused] can let you check the image in the original quality when playback is paused.
Playing Back 4K Video Smoothly
Draft preview is effective in playback of timeline where the data amount is large due to a case such as heavy usage of high quality 4K image clips.
For example, when [1/2] is selected for [Preview Quality], 4K (3840x2160) video is displayed in the image quality equivalent to Full HD (1920x1080). If you edit video on a notebook PC, selecting [1/4] and previewing in full screen can maintain an adequate image quality.
By using the draft preview, you can handle high-quality image sources regardless of the performance of your PC.
-
Draft preview functions effectively in the following commonly used formats.
Sony RAW, Cinema RAW, Cinema RAW Light, Avid DNxHD/Avid DNxHR, Apple ProRes, RED, Motion JPEG, JPEG, Grass Valley HQX
Frame Skip Playback
By thinning frames for preview, the performance of real time playback improves.
Make use of this feature when you apply heavy-load effects such as [Mask] and [Layouter], or when you play the timeline where RAW data clips are placed.
1) Click [Skipped Frames] on the menu bar, and select an item.
-
The image quality for preview will be changed according to the selected item.

|
[Full frames] |
Does not thin out frames for preview. |
|
[1 frame] - [30 frames] *1 |
Thins out the specified number of frames for preview. By increasing the number of thinned-out frames, the load on the PC during playback will be made smaller. |
*1 Select [1 frame] - [5 frames] to specify by1-frame unit, or select [10 frames] - [30 frames] to specify by 5-frame unit.
-
[Skipped Frames] in the multicam mode can hold specific setting values which are different from those in the normal and any other modes.
-
If [Skipped Frames] is set to an option other than [Full frames], the timecode, closed captions, and other information to be displayed on the preview window also appear reduced according to the number of thinned-out frames.
-
If a clip on which [Motion Blur] is applied is played by frame skip playback, the motion in the thinned-out frames will not be used.