Operations in the Preview Pane
Sources and assets/clips can be played back in the preview pane.
Also, you can use the operation panel of the preview pane to set In/Out points or add markers to assets.
-
The show/hide setting for the preview pane can be switched by the following operations.
-
Click [View] on the menu bar, and click [Preview].
-
Click [Preview] on the tool bar.
-

-
Depending on the size of the preview pane, some part of the operation buttons in the operation area may not be displayed.
-
The operation panel is not displayed for some types of asset.
-
Sources and clips can be handled in the same way as assets.
|
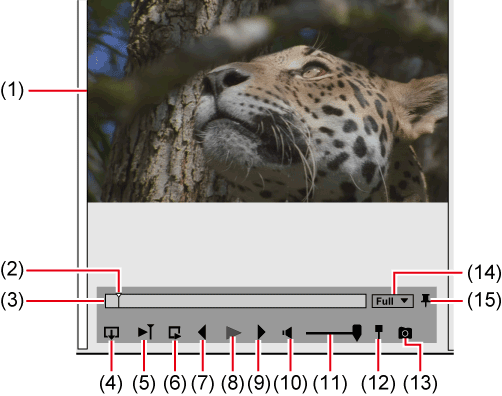
(1) |
Preview area |
The preview image is displayed. |
|
(2) |
Slider |
Drag it to the right and left to change the playback position. A frame of the position of the slider is displayed in the preview area. |
|
(3) |
Position bar |
The timeline of the asset displayed in the preview pane is indicated. Clicking on a point on the position bar displays the frame in the preview area. |
|
(4) |
Audio expand button |
Click this button to expand the operation area and enable selection of audio channels. |
|
(5) |
[Play Around Slider] |
Playback starts from the point three seconds before the position of the slider. To stop playback, click [Stop]. |
|
(6) |
[Loop Play] |
Playback of asset is repeated. To stop playback, click [Loop Play] again, or click [Stop]. |
|
(7) |
[Previous Frame] |
Each click rewinds the timeline one frame at a time in the reverse direction. |
|
(8) |
[Play]/[Stop] |
Start/stop playback of asset. |
|
(9) |
[Next Frame] |
Each click advances the timeline one frame at a time in the forward direction. |
|
(10) |
[Mute] |
Toggle mute/unmute. |
|
(11) |
Volume adjustment |
Adjust the playback volume. |
|
(12) |
[Marker] |
Add a marker to the position of the slider. To delete a marker, move the slider to the marker and click [Marker].
|
|
(13) |
[Snapshot] |
Save the image displayed in the preview pane as a still image. |
|
(14) |
[Preview Quality/Preview Color Space] |
Switch the image quality and color space for preview. In the [Preview Quality/Preview Color Space] area, current settings of [Preview Quality] and [Preview Color Space] are displayed.
Draft preview Change the image quality for preview to improve the performance of real time playback. Click [Preview Quality/Preview Color Space] in the operation area, and select an image quality to set from [Preview Quality]. Switching [Preview Color Space] You can switch the color space for preview. Click [Preview Quality/Preview Color Space] in the operation area, and select a color space to set from [Preview Color Space].
|
|
(15) |
[Pin] |
Every click switches whether or not to always display the operation area of the preview pane. Turn the icon vertical to always display the operation area. Turn the icon horizontal to display the operation area only when the mouse cursor is moved onto the preview pane. |