Transforming/Rotating Video
The layouter can be used to divide the screen, and video images can be placed or rotated in each screen, or keys can be set to each screen and assigned functions.
You can also use the motion tracking feature to make the image on the other track to follow a moving subject or to adjust the image so that the moving subject always appear on the center of the angular field.

-
The layout of text objects in title clips also can be set.
-
For projects having a video quantization bitrate of 10 -bit, layouts are processed with 10 -bit precision retained.
Editing Layouts
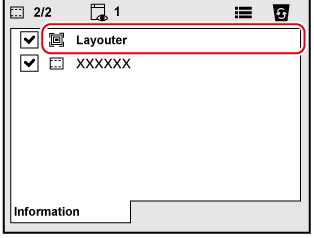
1) Click on a video part of a clip, and double-click [Layouter] in the [Information] palette.
-
The [Layouter] dialog box appears.
 Alternative
-
Click [Clip] on the menu bar, and click [Layouter].
-
Right-click the video part of the V/VA clip on the timeline, and click [Layouter].
-
Starting up layouter: [F7]
-
You can resize the [Layouter] dialog box by moving the cursor to a corner or an edge of the dialog box and dragging the mouse when the cursor shape changes. You can also click [Maximize] to maximize the window size.
-
The display area can be adjusted by moving the cursor to the bottom of the preview or parameter and dragging when the mouse cursor changes shape.
-
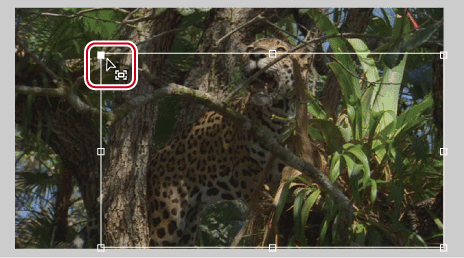
When the mouse is right-clicked in the crop view or transform preview, the menu appears, and you can select tools or switch tabs.
-
When the preview or anchor is dragged while [Shift] on the keyboard held down in the crop preview or transform preview, it can be moved limiting to X or Y axis.
2) Edit the layout.
|
|
|---|
|

3) Click [OK].
-
An orange line is displayed on clips set with the layouter.
-
When the layouter has been edited, its settings can be registered to the [Effect] palette as original effects (user preset effects). Effects registered like this can be exported and imported to EDIUS on other PCs.
[Layouter] Dialog Box
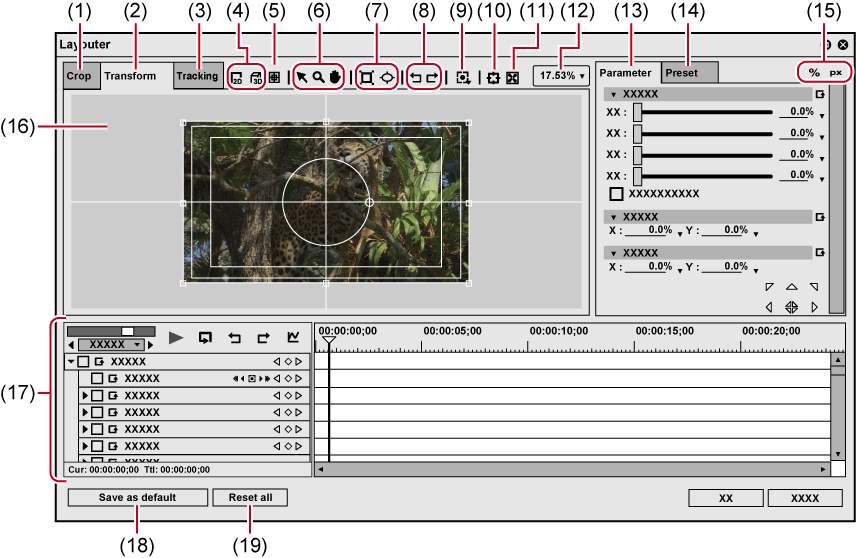
|
(1) |
[Crop] tab |
Display the crop preview. |
|
(2) |
[Transform] tab |
Display the layout preview. |
|
(3) |
[Tracking] tab |
Display the tracking preview. |
|
(4) |
Mode buttons *1 |
|
|
(5) |
Guide indication *1 |
Switch the show/hide setting for guides such as centerline and safe area. |
|
(6) |
Tool buttons |
When the [Tracking] tab is selected, select or move the path. Dragging the handle can zoom in and out or rotate the path.
|
|
(7) |
Drawing buttons *2 |
|
|
(8) |
[Undo]/[Redo] |
[Ctrl] + [Z]
[Ctrl] + [Y] |
|
(9) |
[Tracking] *2 |
Select a tracking method and start tracking. |
|
(10) |
[Centering] |
Center the display area which was moved by the pan tool. |
|
(11) |
[Fit] |
Fit the expanded/contracted display to the display range of the preview screen. |
|
(12) |
Zoom factor |
Change the zoom factor by entering a value or selecting a value from the list. |
|
(13) |
[Parameter] tab |
Edit crops and transforms. |
|
(14) |
[Preset] tab |
Save edited layouts and apply them to other clips. |
|
(15) |
Switch display |
|
|
(16) |
Preview |
Display the preview image in accordance with the selected tab. Selecting a path shows a handle or anchor to modify the path, which enables intuitive editing operations. Right-clicking on the screen displays the menu that is same as the operation buttons on the upper part of the [Layouter] dialog box. |
|
(17) |
Key frame timeline |
Set the key frame to apply change to crops and transforms. The length of the timeline is the duration of the clip currently being edited. |
|
(18) |
[Save as default] |
Click this item to save the current settings as defaults. When a clip is placed on the timeline, the default layout is always applied. |
|
(19) |
[Reset all] |
Click this button to return the layouter settings to their defaults. To return the layout to the settings before they were changed, apply [Default] in the preset. |
 : Switch to 2D mode. Video can be moved or rotated on two dimensions.
 : Switch to 3D mode. Video can be moved or rotated on three dimensions.
 : When the [Crop] or [Transform] tab is selected, drag the mouse to move the screen or perform handle operations.
 : Drag the mouse to expand or contract the screen. From the drag start point, drag to the right to expand screens, and drag to the left to contract.
 : Drag the mouse to move the display area.
 : Drag the mouse to draw a rectangle. Drag the mouse with [Shift] on the keyboard held down to draw a square.
 : Drag the mouse to draw an ellipse. Drag the mouse with [Shift] on the key board held down to draw a circle.
 : Undo an operation.
 : Redo the undone operation.
 : Switch parameters to % display (% display compatible items only).
 : Switch parameters to pixel display (pixel display compatible items only).
*1 Available only when the [Transform] tab is selected. When the [Tracking] tab is selected, the tracking mode selection buttons are displayed.
[Layouter] Dialog Box (Motion Tracking)
*2 Available only when the [Tracking] tab is selected.
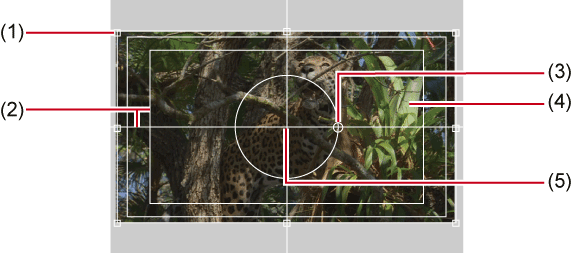
[Crop] tab
Specify the display range by moving the cursor to an operation handle at the four corners or the center of a side and dragging.
[Transform] tab
Reflect edited parameter details in the preview. You can also edit parameters by dragging handles inside the preview.
|
(1) |
Stretch handles |
Move the cursor to the operation handles at the corners and at the middle of the lines to zoom in and out the path. |
|
(2) |
Guide |
Display the underscan, overscan, title safe, and horizontal/vertical centerlines. You can switch the show/hide setting by clicking [Guide]. |
|
(3) |
Rotation handle |
Move the cursor and drag the rotation handle to rotate the image. In the 3D mode, green part rotates around the Y axis, red part rotates around the X axis, and blue part rotates around the Z axis. With rotation on the preview screen, the X/Y/Z axes are the values for video, and with rotation by direct entry of numerical values to parameters, the X/Y/Z axes are the values for the display. |
|
(4) |
Preview |
Display the results of editing parameters. The display position can be changed by dragging the preview. In the 3D mode, the display position can be moved in three dimensions in each of the X, Y and Z axis directions by dragging the arrow.  |
|
(5) |
Anchor |
Display the reference point of video. This point is a reference point for the rotation center and for stretching. Drag with [Ctrl] on the keyboard held down to change the position. |
[Tracking] tab
You can edit the shape that specifies the field of the tracking subject.
|
(1) |
Stretch handles |
Move the cursor to the operation handles at the corners and at the middle of the lines to zoom in and out the path. |
|
(2) |
Anchor |
Indicate the reference point of the path. This point is a reference point for the rotation center and for stretching. Drag with [Ctrl] on the keyboard held down to change the position. |
|
(3) |
Rotation handle |
Move the cursor and drag the rotation handle to rotate the image. |
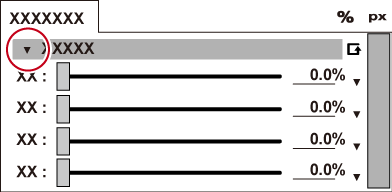
[Parameter] tab
Enter numerical values or edit using the sliders or controls.
You can switch the show/hide setting for the sliders and controls by clicking the expand button on each editing menu.
Click [Set default parameters] to set the layout where settings in edit menus are saved as defaults.
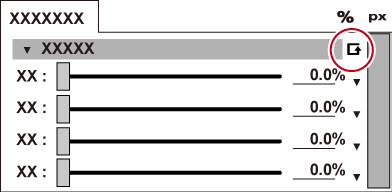
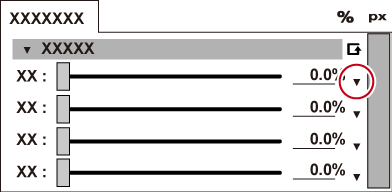
Also, the display unit can be switched by clicking when a blue triangle mark is displayed in the respective value input field.
When the preview screen is edited, the editing details are reflected in parameters.
|
[Source crop] |
Specify the crop range. In the % display, enter the crop ratio for each of the top/bottom/left/right parts with the width and height of the original clip as 100%. In the pixel display, enter the number of pixels to clip. This can also be edited by dragging the slider to the left and right. [Auto adjust anchor] Check this item to change the anchor position according to the crop amount. When this item is unchecked, the anchor does not move even if the crop values are changed. |
|
[Anchor] |
Set the reference position of the video. Set the anchor position by entering X and Y (in the 3D mode, X, Y and Z) with the origin at the center of the source video before it is cropped. |
|
[Position] |
Set the layout position of the video after cropping by directly entering a numerical value or by moving to the safe area. X, Y/X, Y, Z Set where the anchor is to be placed by entering X and Y (in the 3D mode, X, Y and Z) with the origin at the center of the frame. Area selection Select the area to be fitted to with the fit position buttons from the list. Fit position buttons Move the anchor to the upper left, upper edge, upper right, left edge, center, right edge, lower left, lower edge, and lower right of the cropped display area, and place video aligned to the respective position of the guide selected at area selection. During editing in the 3D mode, when the Z value has been changed by the position setting, video is placed at the position of the guide corresponding to depth. |
|
[Stretch] |
Set the scale of the video after cropping by entering a numerical value or clicking the fit button. X, Y Enter the scale with the size of the video after cropping as 100%. Stretch fit button Expand/contract video after cropping to fit the height or width of the screen.
When
[Preserve frame aspect] Check this item to expand/contract video with the aspect ratio of the original image maintained. [Ignore pixel aspect] Perform pixel mapping at actual size with no relation to the pixel aspect ratio. [Resampling method] Select the resampling mode when video is transformed for a clip currently being edited. |
|
[Rotate] |
Rotate the video after cropping. The angle can be rotated by entering a numerical value or moving the cursor to a control and dragging when the mouse cursor changes shape. |
|
[Perspective] |
Set perspective by entering a numerical value or dragging the slider to the left and right. In the 2D mode, [Perspective] is not displayed. |
|
[Opacity and color] |
Enter the opaque ratios for the source and its background, respectively. 0% is transparent and 100% is opaque. This can also be edited by dragging the slider to the left and right. [Color of background] Set the the background color. Click the color box to open the [Color Select] dialog box. |
|
[Edge] |
Attach a frame to video after cropping. [Color] Check this item to enable the color edge. Enter the edge width in pixels. This can also be edited by dragging the slider to the left and right. Click Color box to specify the edge color. [Soft] Check this item to apply blur to the edge. Enter a blur width in pixels. This can also be edited by dragging the slider to the left and right. [Round corner] Check this item to round the corners of edges. [Side] Select from the outside, inside or both sides of edges to apply [Color]/[Soft] to. |
|
[Drop shadow] |
When [Enable drop shadow] is checked, a drop shadow can be attached to video after cropping. Enter numerical values for [Distance] or [Opacity] and [Soften]. This can also be edited by dragging the slider to the left and right. The drop shadow direction can be set by entering an angle at [Angle] or moving the cursor to a control and dragging when the mouse cursor changes shape. Click Color box to specify the drop shadow color. |
 is clicked, video becomes the maximum size in which the entire video image can be displayed.
[Resampling method] in the [Parameter] Tab
[Resampling method] can be selected from the following options.
|
(1) |
[Current project setting] |
|
|
(2) |
[Bilinear (Fast Smooth)] |
|
|
(3) |
[Area Average (Fast Sharp)] |
|
|
(4) |
[Bicubic] |
|
|
(5) |
[Lanczos 2 (Best for interlaced picture)] |
|
|
(6) |
[Lanczos 3 (Hi-Quality)] |
|
|
(7) |
[Lanczos 3 Smoother (Best for motion graphics)] |
|
|
(8) |
[Lanczos 3 Sharper (Best for progressive picture)] |
|
See the following table for the resampling methods of
(2)
to
(8)
. The number of
 indicates the processing ability to process the corresponding events.
-
For zooming in
Defocus
Alias
Overshoot
Calculation speed
(2)
(3)
(4)
(5)
(6)
(7)
(8)
-
For zooming out
Defocus
Alias
Overshoot
Calculation speed
(2)
(3)
(4)
(5)
(6)
(7)
(8)
Motion Tracking ([Layouter])
You can use two types of motion tracking using [Layouter].
Use [Anchor Mode (this layer)] to adjust the image so that the moving subject always appears on the center of the screen.
Use [Chase Mode (lower layer)] to make the image on the other track to follow a moving subject.
In addition to the position of the tracking target, the size and rotation will be analyzed, and the analysis result can be applied.
1) Place clips on tracks accordingly depending on the type of motion tracking.
-
When you use [Anchor Mode (this layer)], place a clip which contains the subject on one track.
-
When you use [Chase Mode (lower layer)], two tracks are used.
Place a clip which contains the subject on a lower track, and place a still image on an upper track to make it to follow the movement of the subject, as well as other clips such as title.
2) Click on a video part of a clip, and double-click [Layouter] in the [Information] palette.
-
When you use [Chase Mode (lower layer)], double-click [Layouter] of the clip placed on the upper track.
-
The [Layouter] dialog box appears.
3) Click the [Tracking] tab.
-
A shape appears in the center of the preview image.
4) Click the tacking mode selection button to select a tracking mode.
-
Select either [Anchor Mode (this layer)] or [Chase Mode (lower layer)] for the tracking mode.
[Anchor Mode (this layer)] sets the subject on the selected clip as the tracking subject. Make adjustments so that the tracking subject always appears on the center of the screen.
[Chase Mode (lower layer)] sets the subject on the clip placed on the lower track as the tracking subject. Make adjustments so that the image on the upper track follows the subject to be tracked.
-
When an analysis result already exists, a message appears to make you to select whether to switch the tracking mode.
Alternative
-
Right-click on the preview image, and click [Tracking Mode] → [Anchor Mode (this layer)]/[Chase Mode (lower layer)].
-
5) Move the timeline cursor to the top frame.
6) Adjust the size and position of the shape to suit the tracking subject.
-
Click a drawing button to create a new shape. When a new shape is created, the existing shape will be deleted.
7) Click [Tracking Option] for [Tracking], and select an analysis item.
-
The analysis item can be selected from [Position], [Scale], [Rotation], and [Distortion].
-
A check mark appears on the selected item.
8) Click [Track Forward] in [Tracking].
-
Tracking in the forward direction starts and a key frame will be set frame by frame. A progress bar is displayed to indicate the progress of the analysis.
-
Tracking will end automatically at the last frame of the clip.
Alternative
-
Click [Tracking] on the upper part of the [Layouter] dialog box, and click [Track Forward].
9) Play back the timeline to view the video.
-
You can preview the video on which the analysis result of [Position] is applied in the preview window.
-
Click on the [Transform] tab, and adjust the position and size as necessary.
-
To apply the analysis results of [Scale] and [Rotation], right-click on the preview image on the [Transform] tab, and click [Apply tracking] → [Scale]/[Rotation]. A check mark appears on the selected item. ([Position] is fixed to “on”.)
10) Click [OK].
-
The [Layouter] dialog box will be closed.
-
Set key frames can be adjusted frame by frame.
-
The unit of time scale display on the [Layouter] dialog box can be adjusted in the time scale settings or by the time scale slider.
-
For the interpolation method, only [Hold] is available.
-
The position and size of the shape will not be saved. They will be maintained only while the [Layouter] dialog box is displayed.
-
If tracking has stopped in the middle, set the key frame manually in the same way as motion tracking for [Mask].
[Layouter] Dialog Box (Motion Tracking)
|
(1) |
Tracking mode selection button |
Select a tracking mode. |
|
(2) |
[Tracking] |
Select a tracking method and start tracking. |
|
(3) |
[Track Reverse] |
Tracks in the reverse direction from the timeline cursor position and sets key frames. Tracking will end automatically at the top frame of the clip. [Ctrl] + [,] |
|
(4) |
[Track Previous Frame] |
Tracks one frame in the reverse direction from the timeline cursor position and sets key frame. [,] |
|
(5) |
[Tracking Option] |
This setting is only used for analysis. [Position] Tracks the position of the object. The default value is ON. [Scale] Tracks the size of the object. The default value is ON. [Rotation] Tracks the rotation of the object. The default value is ON. [Distortion] Tracks the distortion of the object (aspect ratio and shear). The default value is ON. |
|
(6) |
[Track Next Frame] |
Tracks one frame in the forward direction from the timeline cursor position and sets key frame. [.] |
|
(7) |
[Track Forward] |
Tracks in the forward direction from the timeline cursor position and sets key frames. Tracking will end automatically at the last frame of the clip. [Ctrl] + [.] |
Saving Editing Details as Presets
1) Select a clip, start up layouter, and edit the layout.
2) Click the [Preset] tab.
3) Click [New], and click [Yes].
4) Enter a preset name and comment, and click [OK].
-
When the layouter has been edited, its settings can be registered to the [Effect] palette as original effects (user preset effects). Effects registered like this can be exported and imported to EDIUS on other PCs.
-
When a preset is selected in the preset list, and [Save] is clicked, select whether to overwrite save comment edits or editing details or save them as a new preset. To overwrite save, click [OK] without renaming the preset, and click [Yes].
[Preset] Tab
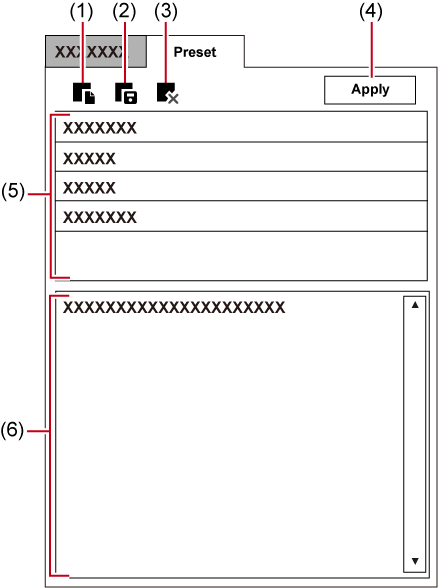
|
(1) |
[New] |
Save the current editing details as a new preset. |
|
(2) |
[Save] |
Save the current editing details. |
|
(3) |
[Delete] |
Delete the currently selected preset. |
|
(4) |
[Apply] |
Select and apply the preset. |
|
(5) |
Preset list |
Displays currently saved presets in a list. |
|
(6) |
Comment |
Display the comment of the currently selected preset. |
Editing Layout with Preset Applied
1) Select a clip, and start up layouter.
2) Click the [Preset] tab.
3) Select a preset, and click [Apply].
Alternative
-
In the preset list, double-click the preset to apply.
4) Click [OK].
-
An orange line is displayed on clips set with the layouter.